Replacing or installing a new sectional garage door (also known as an overhead door or panel door) is a significant home improvement project that enhances curb appeal, security, and functionality.
Installing a Sectional Garage Door: A Comprehensive DIY Guide
Replacing or installing a new sectional garage door (also known as an overhead door or panel door) is a significant home improvement project that enhances curb appeal, security, and functionality. While demanding precision and attention to safety, it's achievable for a competent DIYer with the right preparation, tools, and patience. This guide walks you through the essential steps for a successful installation.
Why Choose a Sectional Door?
Sectional doors are popular for good reason:
- Space-Saving: They open vertically and then horizontally along the ceiling, requiring minimal driveway or interior garage space.
- Durability: Modern doors use robust materials like steel, aluminum, wood composites, or insulated panels.
- Security: They form a solid barrier when closed and integrate well with locking mechanisms.
- Insulation: Insulated models significantly improve garage temperature regulation and energy efficiency.
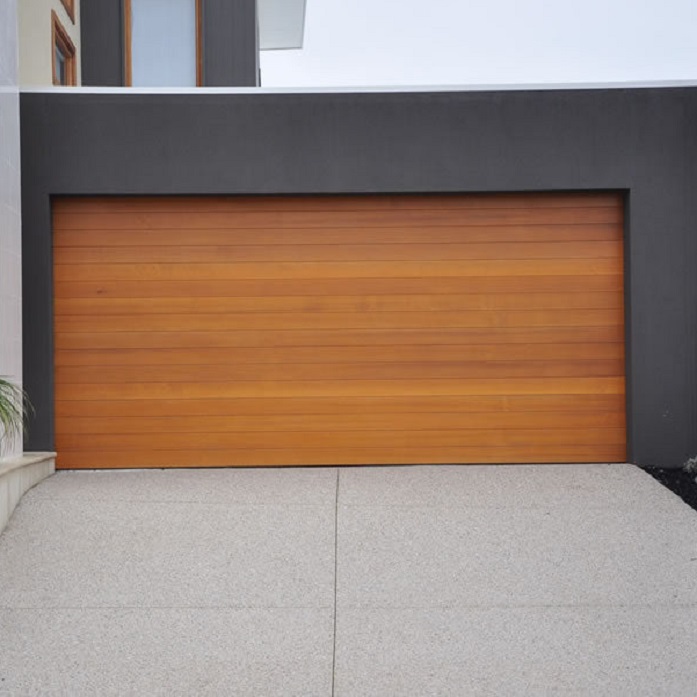
- Aesthetics: Available in countless styles, colors, and window options to match any home.
Crucial Pre-Installation: Planning & Preparation
- Measure Meticulously: Accuracy is paramount. Measure:
- Width: Inside the opening, left to right jamb, at the top, middle, and bottom. Use the smallest measurement.
- Height: Inside the opening, from the floor to the bottom of the header (the horizontal beam above the opening), left, center, and right. Use the smallest measurement.
- Sideroom: Distance from the inside edge of the left/right jambs to the nearest wall or obstruction on each side. Typically needs 3.5-5+ inches per side for tracks and hardware.
- Headroom: Distance from the top of the door opening (bottom of the header) to the ceiling, or the lowest overhead obstruction (pipes, ducts, openers). Critical! Standard torsion spring systems require 10-14+ inches. Low-headroom options exist but need specific kits.
- Backroom: Distance from the garage door opening (inside) to the back wall. Must accommodate the horizontal tracks and the door panels when fully open. Usually requires the door height plus 18-24+ inches.
- Floor Condition: Check for levelness within the opening area. Significant unevenness must be addressed before installation.
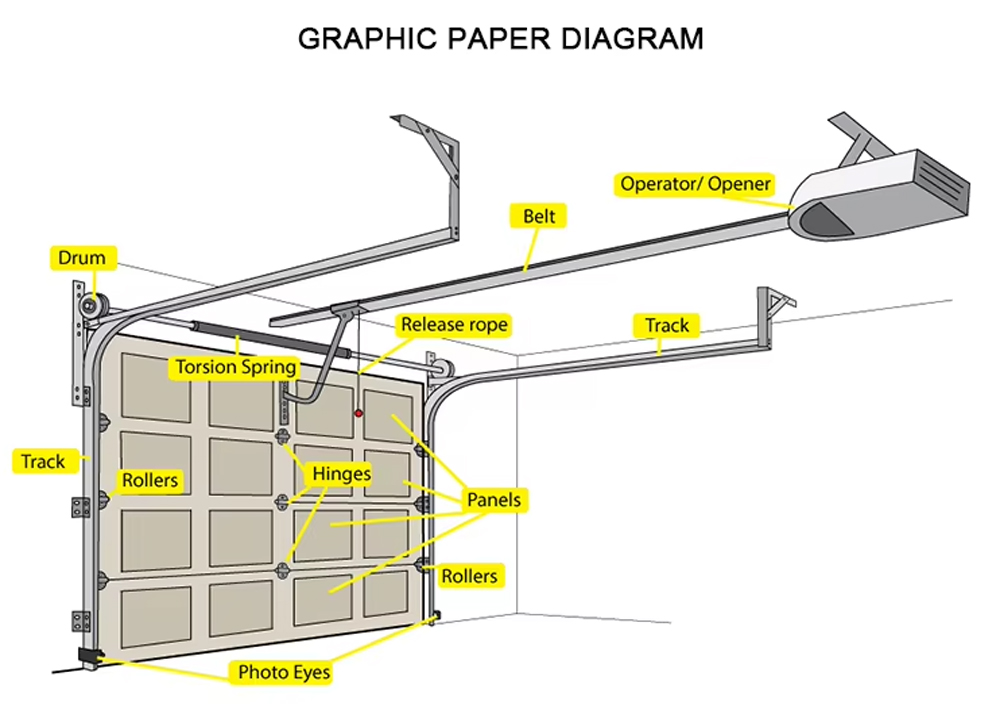
- Select Your Door: Choose a door based on size, material, insulation value (R-value), style, and wind-load rating (if applicable). Purchase a complete door kit specifically designed for DIY installation. This includes panels, tracks, hinges, rollers, springs, cables, brackets, fasteners, and weatherstripping. Never mix components from different manufacturers or kits.
- Gather Tools & Materials:
- Essential Tools: Tape measure, level (4ft & torpedo), sturdy step ladders (or scaffolding for high ceilings), drill/driver with assorted bits, impact driver (highly recommended), ratchet wrenches & sockets (SAE & Metric), adjustable wrenches, locking pliers, hammer, pry bar, tin snips, hacksaw or reciprocating saw (metal blade), safety glasses, work gloves, sturdy closed-toe shoes.
- Highly Recommended: Laser level, helper(s) (at least 2 strong people are crucial for panel handling and track alignment), socket extension bars, torque wrench (for critical fasteners), locking C-clamps or vise grips.
- Materials: Shims, construction adhesive (for struts if needed), lubricant (specifically for garage doors - silicone or lithium-based), possibly concrete anchors if not using existing lag locations.
- Review Instructions & Safety: Thoroughly read the manufacturer's installation manual before starting. Layout all components and verify everything is present. Safety is non-negotiable:
- Springs are EXTREMELY DANGEROUS. Torsion springs (mounted above the door on a shaft) store immense energy. NEVER attempt to install, adjust, or remove torsion springs unless you are a trained professional. Many kits ship with springs pre-tensioned or require professional setup. If yours requires DIY tensioning, STRONGLY CONSIDER HIRING A PRO for this step only. Extension springs (mounted along the horizontal tracks) are also hazardous; always use safety cables running through them.
- Secure ladders properly.
- Wear safety glasses always.
- Use gloves when handling metal components.
- Disconnect power to the garage door opener if present.
- Never work under a door supported only by temporary braces.
Installation Step-by-Step:
Phase 1: Preparing the Opening & Installing Bottom Section
- Remove Old Door & Hardware (If Applicable): Carefully disconnect the opener (if present). Release spring tension (professionally if torsion). Remove tracks, hinges, and finally, the door sections. Patch holes as needed. Clear the work area completely.
- Install Weatherstripping: Apply the vinyl bottom seal to the bottom edge of the bottom door panel according to instructions (often slides into a retainer channel). Install the threshold seal (if provided) on the floor across the opening.
- Install Bottom Bracket & Hinges: Attach the bottom roller brackets (L-shaped) to each end of the bottom panel, typically near the bottom corners. Install the first set of hinges (often "bottom" or "standard" hinges) along the top edge of the bottom panel, positioned as per the manual's diagram (spacing is critical for track alignment).
- Position Bottom Section: Carefully lift the bottom panel into place within the opening. It must sit flat on the floor and be centered left-to-right. Temporarily brace it vertically using sturdy 2x4s cut slightly longer than the opening height, wedged between the floor and the top of the panel. Ensure it's perfectly plumb (vertical) using your level. This panel sets the foundation for everything above.
Phase 2: Installing Tracks & Vertical Sections
- Assemble & Install Vertical Tracks: Assemble the left and right vertical (L-track) sections according to the manual. Pay close attention to orientation (curved lip faces the garage interior). Position the track against the wall/jamb. The bottom end must align precisely with the roller on the bottom bracket. Ensure the track is perfectly plumb using your level. Critical: The distance from the inside of the track to the edge of the door opening must match the manual's specification for your hardware (e.g., 2.75" or 3.25"). Shim behind the track if necessary to achieve plumb and the correct setback. Pre-drill holes and securely fasten the track to the wall studs using the provided lag screws and washers. Start at the bottom, then the top, then add intermediate fasteners. Repeat for the other side. Double-check plumb and alignment.
- Install Intermediate & Top Sections: Attach the appropriate hinges (standard, top, possibly center-hinge) to the top edge of the next panel up. Carefully lift this panel into place above the bottom panel. Align the hinges with the brackets on the bottom panel. Insert hinge pins (usually bolts) and loosely fasten. Connect the rollers on this new panel into the vertical track. Temporarily brace this panel plumb. Repeat the process for each subsequent panel:
- Attach hinges to the top of the panel you're installing.
- Lift and position.
- Align hinges with the panel below.
- Insert hinge pins loosely.
- Insert rollers into the track.
- Brace plumb.
- Periodically check that the entire assembly remains plumb and centered.
- Install Top Section & Header Bracket: Install the top fixtures (top fixtures instead of standard hinges) onto the top edge of the top panel. Lift the top panel into position. Connect its hinges to the panel below and insert its rollers. Critical Step: Install the heavy-duty header bracket above the center of the door opening. It must be anchored securely into solid header framing (not just drywall!). Use appropriate lag bolts or concrete anchors. Ensure it's level.
Phase 3: Installing Horizontal Tracks & Spring System
- Assemble & Install Horizontal Tracks: Assemble the horizontal tracks (ceiling tracks) and end plates/pulleys (for extension springs) or bearing plates (for torsion springs). Position the tracks so they connect smoothly to the top of the vertical tracks. The angle and height are crucial – follow the manual precisely. The tracks must be level and parallel. Support them securely using angle iron or strapping hung from the ceiling joists. Fasten the tracks and their supports rigidly. The end bearing plates (torsion) or end pulleys (extension) must be anchored firmly to structural members.
- Install Spring System (PROCEED WITH EXTREME CAUTION OR HIRE A PRO):
- Torsion Springs (Most Common & Dangerous): Mount the torsion tube through the bearing plates on the horizontal tracks. Install the winding cones, cable drums, and springs onto the tube according to the manual. THIS IS THE MOST HAZARDOUS PART. Connecting and tensioning the springs requires specialized winding bars and precise quarter-turn increments. ONE SLIP CAN CAUSE SEVERE INJURY OR DEATH. If your kit requires DIY tensioning, HIGHLY RECOMMEND hiring a professional technician for this step. If springs were pre-installed/tensioned, proceed carefully per instructions.
- Extension Springs: Attach the springs to the anchor brackets on the horizontal track end plates/pulleys. Attach the safety cable through the center of the spring and securely anchor it to the wall or ceiling framing at the rear. Never operate without safety cables! Connect the S-hooks on the springs to the cable or pulley system leading down to the bottom roller brackets.
- Install Lift Cables (Torsion System): Attach the lift cables to the cable drums on the torsion tube. Run the cables down, over the rollers on the bottom bracket, and secure them firmly into the cable retainers on the bracket. Ensure cables wind correctly onto the drums as the door moves.
Phase 4: Final Adjustments, Hardware & Testing
- Tighten & Align: Once the entire door and track system are in place, go back and securely tighten all bolts, nuts, lag screws, and fasteners. Double-check track alignment – they should be parallel, plumb (vertical sections), level (horizontal sections), and the correct distance apart. Rollers should move freely without binding.
- Install Weatherstripping & Stops: Install the weatherstripping along the sides and top of the opening (jamb seal). Install the rubber or vinyl track stops at the bottom end of the vertical tracks to prevent rollers from coming out.
- Adjust Spring Tension (If Applicable & Done by Pro): A professional will adjust spring tension so the door is balanced. A properly balanced door will stay open about 3-4 feet above the floor when lifted manually. If DIY tensioning was done (not recommended), follow the manual's balancing procedure meticulously.
- Install Locks & Handles: Install the interior lock/release mechanism and any exterior handles per instructions.
- Lubricate: Apply garage door lubricant to rollers, hinges, springs (lightly), and the torsion tube/bearings. Avoid oil-based lubricants that attract dirt.
- Test Thoroughly:
- Manually open and close the door slowly. It should operate smoothly with minimal effort, staying level and not binding or jerking.
- Check balance: Lift to halfway. It should stay in place without rising or falling.
- Listen for unusual noises (scraping, grinding, popping).
- Check all safety features if an opener is installed later (reversal on obstruction, force settings).
Important Considerations & When to Call a Pro:
- Complexity & Weight: Garage doors are heavy. Maneuvering panels, especially top sections in high garages, requires strength and coordination. Dropping a panel causes severe damage or injury.
- Spring Danger: Cannot be overstated. Torsion spring installation/tensioning is best left to certified technicians with the proper tools, training, and insurance.
- Structural Issues: If your opening isn't square, your header is insufficient, or walls are damaged, professional assessment is needed.
- Low Headroom/Backroom: These require specialized hardware and expertise.
- Time Commitment: Allow a full day or weekend for a first-time DIY installation.
- Warranty: Some manufacturers may void warranties if not professionally installed.
Conclusion:
Installing a sectional garage door is a substantial but rewarding DIY project that requires careful planning, precise execution, strict adherence to safety protocols (especially regarding springs), and patience. By meticulously following your specific door kit's instructions, double-checking measurements and alignments, and enlisting strong helpers, you can achieve a successful installation that enhances your home's functionality and appearance. However, always recognize the inherent risks, particularly with spring systems. If you have any doubts about your ability to handle the springs, structural requirements, or the overall complexity, investing in professional installation is the wisest and safest choice. Enjoy your new garage door!